Flowers
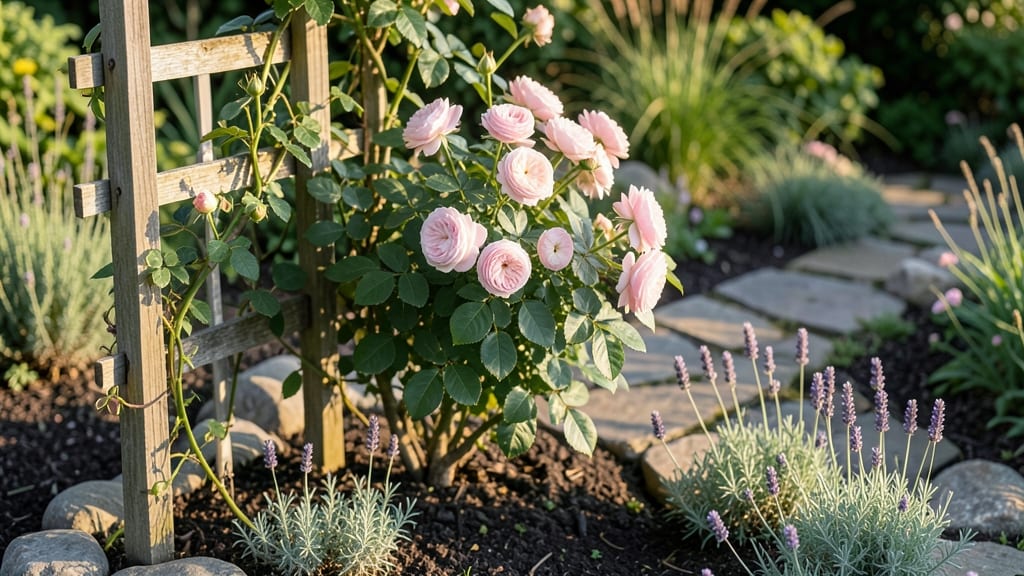
These stunning images of flower gardens in the Pacific Northwest turn every season into a living painting—just like a forest edge in your backyard. 🌿 I’ve designed these gardens to thrive in our cool, damp climate while still packing in bold colors and textures that surprise visitors.
What makes these gardens special is how they balance native plants with showstopping blooms. Think heuchera with its velvety leaves, shrub roses that climb trellises, and dwarf conifers that add structure without overwhelming smaller spaces.
The key is mixing evergreens for year-round interest with seasonal flowers that shift from spring’s bleeding hearts to fall’s sedum bursts.
You’ll end up with a garden that feels lush and intentional, not just pretty—one that attracts pollinators, handles rain and shade, and still turns heads. The best part?
These layers work in containers too, so even small patios can get that forest-meets-blooms effect. Let’s break down how to recreate this magic at home.
Whether you’re starting from scratch or refreshing an existing bed, the principles stay the same: tall, medium, and low plants create drama, while evergreens anchor the design. I’ll show you how to layer colors and textures so your garden feels like a curated art piece—no green thumb required.
📚 In This Guide
- What you need
- Instructions
- Tips and common mistakes
- Wrapping up and next steps
What you need
- ● Plants for Canopy Layers: 1-3 large shrubs or small trees (e.g., Rhododendron, Magnolia, or Dogwood) for the upper canopy.
- ● 3-5 medium-height shrubs (e.g., Pieris, Viburnum, or Oregon Grape) for the mid-layer.
- ● 5-10 perennial flowers (e.g., Heuchera, Astilbe, Lungwort, or Pacific Coast Iris) for ground cover and texture.
- ● 10-20 annuals or biennials (e.g., Lobelia, Sweet Alyssum, or Foxglove) for seasonal pops of color.
- ● Soil Amendments: 5-10 bags of peat moss or compost (for acid-loving plants like Rhododendrons).
- ● 1-2 bags of mulch (cedar or pine bark works well for moisture retention).
- ● Hand Tools: 1 garden trowel (for transplanting small plants).
- ● 1 pruning shears (for shaping and trimming).
- ● 1 hand fork (for aerating soil).
- ○ Larger Tools (Optional but Helpful): 1 shovel or spade (for digging larger holes).
- ● 1 wheelbarrow (for moving soil or mulch).
- ● 1 hose with a spray nozzle (for gentle watering).
- ● A well-draining, slightly acidic soil (pH 5.0-6.5 is ideal for many PNW natives).
- ● Partial to full shade (depending on your plant choices—some thrive in dappled sunlight).
- ● Access to water (a drip irrigation system or soaker hose is ideal for consistency).
- ● Time for planning—sketch your garden layout before purchasing plants!
- ● Decorative garden stakes or labels (for plant identification).
- ● Natural stone borders or stepping stones (to define pathways).
- ● Outdoor string lights or solar-powered lanterns (for evening charm).
- ● Seated garden benches or a small water feature (to enhance relaxation).
How to design Pacific Northwest-inspired canopy layers in flower gardens
Transform your garden into a lush, layered Pacific Northwest retreat with these intentional design principles.
🌿 Step 1: Plan Your Vertical Structure
Start by identifying your garden's tallest elements—these will form your canopy layer. In the Pacific Northwest, coniferous trees like Douglas fir or western red cedar naturally dominate the upper canopy, but you can also use ornamental trees such as Japanese maples or flowering cherries for a softer look. Sketch a rough layout, marking where each tree will cast dappled shade for understory plants.
Measure the mature height and spread of each tree to ensure they won’t overcrowd smaller plants. I like to leave at least 8-10 feet between large canopy trees to allow airflow and prevent disease. If space is limited, opt for smaller varieties like the ‘Emerald Green’ arborvitae, which still provides ample shade while keeping a compact footprint.
☀️ Step 2: Layer in Mid-Height Plants
Now add your mid-height plants, which should reach 3-6 feet at maturity. Pacific Northwest natives like salal, rhododendrons, or Oregon grape make excellent choices here, offering both structure and seasonal interest. Space these plants 3-5 feet apart to create a dense but natural-looking understory that filters light beautifully.
Look for plants with textured foliage—think leatherleaf or sword ferns—to add depth and contrast. I always include at least one flowering shrub, like a Pacific dogwood or western azalea, to provide seasonal color while maintaining the region’s organic aesthetic. These mid-height plants should be placed slightly behind the canopy layer to create visual depth.
🌱 Step 3: Fill the Understory with Ground Covers and Perennials
The understory is where the magic happens in a Pacific Northwest garden. Use shade-tolerant ground covers like creeping phlox, foamflower, or wild ginger to fill gaps and create a lush carpet. These plants thrive in the dappled light cast by the canopy and add vibrant color in spring and summer.
Incorporate perennials like bleeding heart, lungwort, or trillium for vertical interest and seasonal blooms. I like to group plants with similar moisture and light needs together—this ensures they all thrive without competition. Add a few ferns, like deer fern or lady fern, for that classic Pacific Northwest texture and to soften the transition between layers.
💧 Step 4: Add Focal Points and Seasonal Interest
No canopy layer is complete without focal points that draw the eye and add seasonal variety. In the Pacific Northwest, consider adding a small ornamental grass like carex or a flowering shrub like camellia for winter interest. Place a few boulders or a small water feature to create natural focal points that mimic the region’s rugged beauty.
Think about how your garden will look year-round. Include evergreens like boxwood or hemlock for winter structure, and add spring bulbs like snowdrops or bleeding heart to ensure there’s always something in bloom. I like to incorporate a few unexpected textures, like a drift of white heather or a cluster of purple crocus, to add unexpected pops of color.
✂️ Step 5: Maintain and Refine Over Time
Once your canopy layers are established, maintenance becomes about gentle refinement rather than heavy pruning. Prune dead or overgrown branches in late winter or early spring, just as new growth begins. I always step back to assess the garden in each season—this helps me spot gaps or overgrowth that needs attention.
Mulch generously with wood chips or shredded bark to retain moisture and suppress weeds, which is especially important in the Pacific Northwest’s damp climate. Fertilize lightly in early spring with a balanced, slow-release fertilizer to support new growth without overwhelming the soil. Over time, your garden will develop its own natural rhythm, with each layer complementing the others in a harmonious display.
Tips & tricks for Pacific Northwest-inspired canopy layers
Creating a stunning Pacific Northwest garden isn't just about planting—it's about crafting visual harmony through intentional layering. Here's how to elevate your design with these proven strategies.
Canopy Layer Spacing Secret: When placing your 8-10 foot canopy trees in Step 1, consider their mature spread as much as their height. I've found that spacing them 12-15 feet apart creates that perfect dappled light effect the Pacific Northwest is known for. This spacing also prevents future overcrowding while allowing each tree to develop its natural character. Think of it as creating a forest floor experience right in your garden.
Mid-Height Plant Placement: In Step 2, the 3-6 foot plants should be positioned slightly behind the canopy layer to create visual depth. I like to imagine a "V" shape when looking at the garden—tall trees at the back, mid-height plants in the middle, and ground covers in front. This arrangement mimics natural woodland ecosystems and creates that magical layered look. For extra drama, place your flowering shrubs like Pacific dogwoods near seating areas where their blooms can be fully appreciated.
Understory Texture Strategy: The understory in Step 3 is where you can really play with textures. I recommend mixing broadleaf plants like lungwort with fine-textured ferns to create contrast. For example, pair the velvety leaves of lungwort with the delicate fronds of lady fern. This texture play creates visual interest even when plants aren't in bloom. Remember that in the Pacific Northwest, where we experience all four seasons, texture becomes your year-round design feature when flowers aren't available.
Seasonal Layering Technique: For Step 4, think about adding winter interest plants like camellias or hellebores that will provide color and structure when other plants are dormant. I like to create "color echoes" by repeating certain hues throughout the layers—like using white heather in the understory to complement white flowering shrubs in the mid-height layer. This creates a cohesive look that feels intentional rather than random. The key is to plant these focal points where they'll be visible from multiple angles in your garden.
Pro Tips for Images Of Flower Gardens
- Creating a stunning Pacific Northwest garden isn't just about planting—it's about crafting visual harmony through intentional layering.
- Canopy Layer Spacing Secret: When placing your 8-10 foot canopy trees in Step 1, consider their mature spread as much as their height.
- Mid-Height Plant Placement: In Step 2, the 3-6 foot plants should be positioned slightly behind the canopy layer to create visual depth.
Frequently asked questions
Got questions about creating stunning Pacific Northwest-inspired flower gardens with canopy layers? Here are some of the most common ones—and their answers!
What’s the best time of year to plant a layered flower garden in the PNW?
The ideal time depends on the plants! For perennials and shrubs, early spring (March–April) or fall (September–October) works best—so they establish roots before summer heat or winter frost. Annuals and bulbs can go in after the last frost (late April–May). Pro tip: Check your USDA hardiness zone (PNW is mostly 7–9) for specific plant recommendations!
How do I keep my layered garden thriving with minimal watering?
Layering reduces water needs by combining drought-tolerant plants (like salvias or lavender) with mulch (wood chips or bark). Group plants with similar water needs together, and focus on deep watering (1–2 inches per week) rather than frequent shallow sprinkles. Bonus: Native PNW plants like sword ferns and rhodies thrive with natural rainfall once established!
Can I create a canopy layer without big trees? What are some alternatives?
If trees aren’t an option, try tall shrubs (e.g., Hollyhocks, Russian Sage), ornamental grasses (like Miscanthus), or even perennial flowers with vertical growth (e.g., Delphiniums, Foxgloves). For height, use trellises or arbors to train climbers like Clematis or Honeysuckle.
How do I prevent pests from ruining my layered garden?
PNW gardens attract slugs, aphids, and deer, but prevention is key! Use organic slug bait (copper tape or diatomaceous earth), neem oil for insects, and deer-resistant plants (like Daffodils or Lamb’s Ear). Quick fix: Handpick pests early in the morning when they’re sluggish!
What’s the easiest way to capture stunning images of my flower garden?
Start with golden hour (early morning or late afternoon) for soft light. Use a tripod or prop your phone on a stable surface for sharp shots. Play with layers—include foreground foliage (like hostas) and background textures (e.g., ferns or bark). Apps like Snapseed or _VSCO_ can enhance colors naturally. Pro move: Add a water feature or butterflies for dynamic life!
Wrapping up and next steps
From lush canopies to delicate understory blooms, the Pacific Northwest-inspired flower gardens offer a breathtaking blend of nature’s artistry and serene beauty. Whether you’re a seasoned gardener or just starting, these layered designs prove that every space can flourish—one petal at a time! 🌸
Ready to bring this magic to your yard? Start small: sketch a simple layout, gather a few key plants, and let your garden grow organically. Need inspiration? Browse images of flower gardens for real-life examples, then roll up your sleeves—your future garden awaits!