
Shrubs
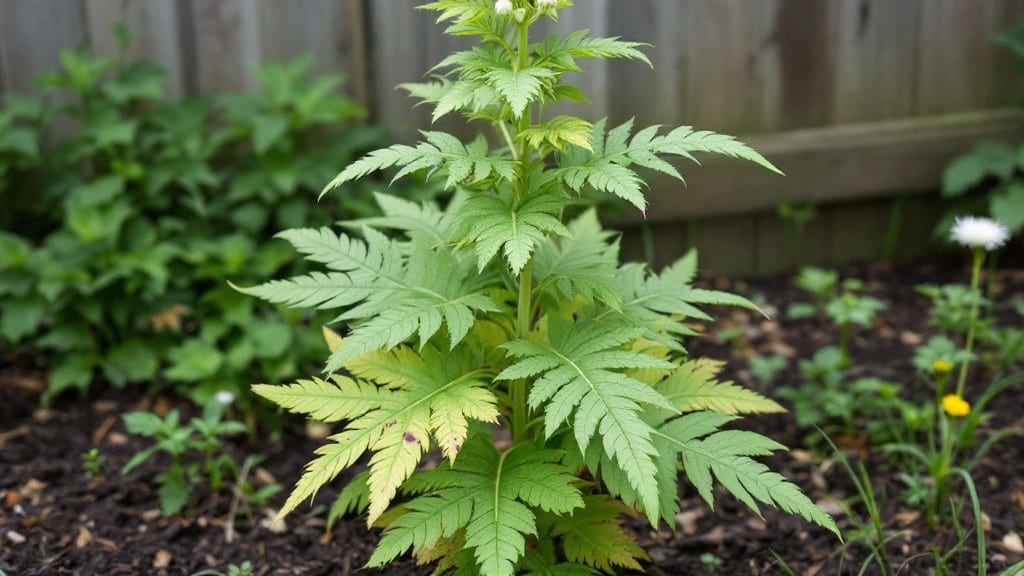
Identifying poison hemlock before it flowers could save a life—or at least spare you a trip to the ER. 🌿 This tall, striking plant with purple-spotted stems and fern-like leaves looks innocent, but every part of it is deadly if ingested, even in small amounts.
I learned the hard way when I nearly pulled up a patch thinking it was wild carrot (Queen Anne’s lace), only to realize my mistake too late.
The key is acting fast: before those delicate white flower clusters form, the plant’s toxic alkaloids are at their most concentrated. You’ll need gloves, long sleeves, and a sealed bag for disposal—never burn it, as the smoke contains toxins too.
Most gardeners confuse it with edible plants like wild parsnip or even celery, so I’ll walk you through the telltale signs that distinguish it from safe lookalikes.
Once you spot it, removal is straightforward but requires caution. Dig up the entire root system (those taproots can stretch deep) and double-bag everything. If you’re unsure or dealing with a large patch, call your local agricultural extension office—they’ll help with safe disposal or reporting.
Your pets and kids are safer without this plant anywhere near your yard.
After removal, keep an eye out for regrowth, as hemlock seeds can linger in the soil for years. If you’ve got kids, livestock, or curious pets, this is one plant you’ll want to eliminate completely.
Here’s how to do it without putting yourself at risk—and how to avoid future encounters with this dangerous imposter.
📚 In This Guide
- What you need
- Instructions
- Tips and common mistakes
- Wrapping up and next steps
What you need
- ● Nitrile or latex gloves (2+ pairs) – Thick, puncture-resistant to block sap absorption.
- ● Long-sleeved shirt and long pants – Made of tightly woven fabric (e.g., cotton or synthetic blends).
- ● Safety goggles – ANSI-rated to protect against sap splashes.
- ○ N95 respirator mask – Optional but recommended if burning or grinding the plant.
- ● Heavy-duty pruners or loppers – Bypass-style, 6-8” blades for clean cuts.
- ● Shovel or garden fork – For deep-rooted plants (root systems can extend 3+ feet!).
- ● Trash bags (20+ gallon) – Heavy-duty, leak-proof for disposal.
- ○ Plastic sheeting (optional) – 4’x6’ tarp to contain debris during removal.
- ● Positive ID confirmation – Use a field guide or app (e.g., iNaturalist) to avoid mistaking it for wild carrot or Queen Anne’s lace.
- ● Local regulations check – Verify disposal rules (some areas require hazardous waste protocols).
- ● Pet/child-free zone – Ensure no one or no pets enter the work area during removal.
How to identify and safely remove poison hemlock before it flowers
Here's how I spot and eliminate this dangerous plant before it spreads and flowers—critical for keeping your yard safe.
🌿 Step 1: Confirm Identification with Key Visual Cues
Poison hemlock (Conium maculatum) looks like giant Queen Anne's lace but with critical differences. Check for purple-spotted stems (especially near the base) and feathery, fern-like leaves arranged in triplets. The stems are hollow and ridged, and the plant grows 3-10 feet tall—taller than wild carrot.
Here's the thing—it smells like mousy urine when crushed. That's your first clue if you're unsure. Never rely on smell alone, though; always verify with the purple stems and leaf arrangement. I always compare suspicious plants side-by-side with a known Queen Anne's lace sample to be absolutely certain.
✂️ Step 2: Gather Removal Tools and Safety Gear
You'll need thick gardening gloves (nitrile or leather), long sleeves, eye protection, and a sharp shovel or digging fork. Poison hemlock's sap contains coniine, a neurotoxin that can be absorbed through broken skin. I keep a small trash bag nearby to immediately contain all plant parts—roots included.
Work on a clear, dry day when the ground isn't muddy. Wet soil makes root removal harder and increases the chance of spreading seeds. If you're near water sources or have pets/kids, wear disposable coveralls for extra protection. I've seen too many cases where people underestimate the plant's danger.
🪴 Step 3: Dig Out the Entire Root System
Start by cutting the plant 2-3 inches below ground level with your shovel to prevent root fragments from resprouting. Then, dig in a wide circle around the base—poison hemlock spreads via taproots that can extend 3-4 feet deep. You'll know you've got the whole root when you see the white, fleshy taproot fully exposed.
Don't just pull it—you'll break the root and leave viable pieces behind. I always double-check by washing the hole with a hose afterward to flush out any hidden root fragments. Bag the entire plant immediately, including roots, and do not compost—even small pieces can regrow.
💧 Step 4: Clean and Monitor the Area
After removal, scrub your tools with soapy water to remove any plant residue. Then, cover the soil with 3-4 inches of cardboard followed by mulch to prevent new seeds from sprouting. Hemlock seeds can lie dormant for years, so this step is non-negotiable if you want to stay safe.
Monitor the area for new shoots for at least two growing seasons. If you spot any, remove them immediately using the same digging method. I mark the spot with orange flags for a full year to remind myself to stay vigilant. This plant is persistent, and cutting it down without root removal is a common mistake that leads to regrowth.
🚨 Step 5: Dispose of the Plant Safely
Place the entire plant (including roots) in a sealed plastic bag and dispose of it in the trash, not your compost or yard waste. Some municipalities require special hazardous waste disposal for toxic plants—check your local regulations. I've seen cases where people threw it in the compost pile and ended up with hemlock growing back stronger.
If you're unsure about disposal, burn the plant (where legally allowed) in a contained fire pit—but only if you can fully incinerate all parts. Never burn it in an open area where seeds could spread via wind. After disposal, wash your gloves and clothes with hot, soapy water to remove any residual toxins.
Tips & tricks for handling poison hemlock safely
Removing poison hemlock requires precision—and a few extra precautions you might not realize. Here's what I've learned from years of dealing with this toxic plant.
Double-Check with a Field Guide: The purple-spotted stems in Step 1 are your best clue, but I always cross-reference with a trusted field guide or app. Some lookalikes like wild parsnip can be just as dangerous. In doubt, treat it as hemlock and remove it carefully. I keep a laminated ID card in my gardening toolbox for quick reference.
Root Removal is Non-Negotiable: In Step 3, those taproots can extend 3-4 feet deep—don't rush this part. I've seen regrowth from even small root fragments left behind. After cutting 2-3 inches below ground, use your shovel to gently wiggle the root free. If resistance feels too strong, you haven't got the whole root yet.
Safety Gear Upgrade: The gloves and long sleeves in Step 2 are essential, but I add a disposable coverall suit when working near water sources or with pets/kids. The coniine toxin can be absorbed through skin, and I've had too many close calls to take chances. A simple dust mask helps with the unpleasant smell too.
Monitoring Hack: For Step 4's two-season monitoring, I set up a small orange flag at each removal site and take photos of the area. This visual record helps me track any new growth immediately. I've caught regrowth as early as 6 months after removal—don't skip this step!
Pro Tips for Poison Hemlock Before Flowering
- Removing poison hemlock requires precision—and a few extra precautions you might not realize.
- Double-Check with a Field Guide: The purple-spotted stems in Step 1 are your best clue, but I always cross-reference with a trusted field guide or app.
- Root Removal is Non-Negotiable: In Step 3, those taproots can extend 3-4 feet deep—don't rush this part.
Frequently asked questions
How do I tell poison hemlock apart from wild carrot (Queen Anne’s lace) before it flowers?
Look for smooth, purple-spotted stems and feathery, fern-like leaves arranged in triplets. Wild carrot has hairy stems, hollow stems, and a single purple flower in the center after blooming. Poison hemlock lacks this "flower umbrella" and has a musty, parsley-like odor when crushed.
Is poison hemlock more dangerous before or after flowering?
It’s toxic year-round, but before flowering, it’s harder to ID and may be mistaken for edible plants like parsley. After flowering, its purplish stems and seed stalks make it easier to spot. All parts—roots, stems, leaves—are deadly, so never ingest or touch without gloves.
What’s the best time of year to remove poison hemlock before it flowers?
Target it in early spring (March–April) when it’s young and 6–12 inches tall. This prevents seed spread. Use gloves, long sleeves, and a trash bag to avoid skin contact. Never burn it—toxic fumes can be released.
Are there natural alternatives to herbicides for removing poison hemlock?
Yes! Try vinegar (20% acetic acid) + dish soap (spray on leaves, repeat weekly). For large patches, solarization (covering with black plastic for 4–6 weeks) smothers it. Hand-pulling works best in moist soil—grab the root to prevent regrowth.
What should I do if I accidentally touch poison hemlock?
Wash skin with soap and water immediately. Avoid rubbing eyes. If ingested (even a small amount), call Poison Control (1-800-222-1222) or seek emergency care. Symptoms include dizziness, dilated pupils, and respiratory distress—act fast!
Wrapping up and next steps
Identifying and removing poison hemlock before flowering is crucial for keeping your garden—and your family—safe. This toxic plant may look harmless, but its presence can pose serious health risks. By following the steps outlined, you’ve armed yourself with the knowledge to spot, avoid, and eliminate it effectively.
🌱 Next steps: Stay vigilant in your garden, especially in areas where this plant thrives. Share this guide with neighbors or gardening groups to help spread awareness and keep communities safer. Your proactive efforts make a real difference! 💪