Flowers
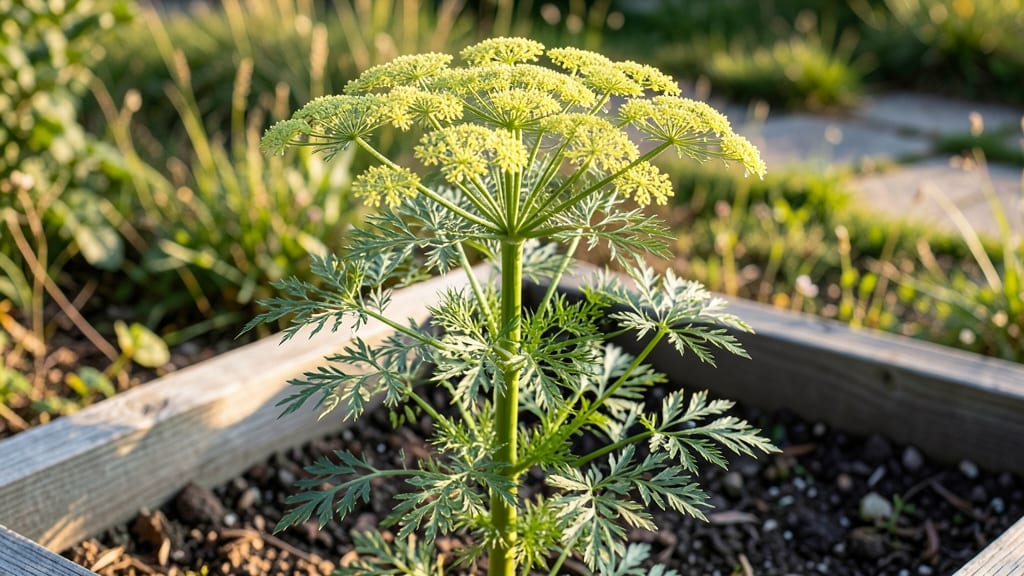
Fresh dill flowers aren’t just pretty—they’re edible, pollinator magnets, and a game-changer for any herb garden. 🌿 I’ve grown dill for years, but it wasn’t until I let those delicate yellow blooms form that I realized how much more this plant could offer.
The secret? Giving it the right conditions so it doesn’t bolt too early or go to seed before you’re ready.
Dill thrives in full sun and well-draining soil, but the real trick is consistent moisture—especially when those flower stalks start to rise. A light pinch of fertilizer at planting can encourage lush growth, but don’t overdo it.
The plant will reward you with clusters of tiny, fragrant blooms that bees and butterflies can’t resist, all while adding a bright, anise-like flavor to dishes.
Once the flowers appear, you’ll have about two weeks to enjoy them fresh in salads, garnishes, or even pickled with the stems. Harvesting the blooms also keeps the plant producing more, so the more you snip, the more it grows.
Save some seed heads for later—they’re perfect for drying and saving for next season’s garden.
Pair dill with other pollinator-friendly plants like cilantro, fennel, or marigolds to create a mini ecosystem in your garden. Just watch for spider mites, which love dry conditions, and keep the soil evenly moist to keep both the plant and its visitors happy.
📚 In This Guide
- What you need
- Instructions
- Tips and common mistakes
- Wrapping up and next steps
What you need
- ● Dill seeds: Choose Anethum graveolens (culinary dill) for edible flowers and foliage. You’ll need about 10–20 seeds per plant (or 1–2 tbsp for a small container). Opt for organic, non-GMO seeds if possible.
- ● Potting soil: Well-draining, organic-rich soil (e.g., a mix of 50% garden soil + 50% compost). Avoid heavy clay soil.
- ● Containers or garden bed: For containers: Use pots at least 6–8 inches deep with drainage holes. A 5-gallon bucket or hanging basket works well for multiple plants.
- ● For garden beds: Ensure full sun (6+ hours/day) and space plants 12–18 inches apart.
- ● Watering can or spray bottle: A gentle watering system (like a rose nozzle) prevents disturbing seedlings.
- ● Garden gloves – Protect your hands from prickly stems.
- ● Trowel or small shovel – For transplanting seedlings or loosening soil.
- ● Pruning shears – To harvest flowers or deadhead spent blooms (encourages more flowers!).
- ○ Organic fertilizer (optional) – A balanced 10-10-10 or fish emulsion boosts growth. Use sparingly!
- ● Mulch (e.g., straw or shredded leaves) – Helps retain moisture and suppress weeds.
- ○ Pollinator-friendly companion plants (optional) – Pair with basil, marigolds, or nasturtiums to attract bees and butterflies!
- ● Sunlight: Full sun (6+ hours/day) is a must—dill flowers thrive in warmth!
- ● Temperature: Ideal germination temps: 70–75°F (21–24°C). Avoid frost (below 40°F/4°C stunts growth).
- ● Patience: Seeds germinate in 7–21 days (sometimes slower in cool soil). Flowers appear in 60–70 days.
- ● Space: Dill grows 2–4 feet tall—ensure your spot can accommodate its height!
How to grow fresh dill flowers for edible blooms and pollinators
Here's my go-to method for growing dill with abundant, fragrant flowers that bees adore—and yes, you can eat them too.
🌱 Step 1: Choose the Right Dill Variety and Planting Time
Pick a biennial dill variety like 'Bouquet' or 'Fernleaf' for the best blooms. These types grow 2-3 feet tall and produce flat-topped umbels of tiny yellow flowers. Start seeds indoors 6-8 weeks before your last frost or sow directly in the garden after soil warms to 50°F—dill hates cold, wet soil.
I always plant mine in late spring because early starts often bolt too fast in hot climates. If you're in a warm zone, try a fall planting for winter blooms. The key is consistent moisture during germination—dill seeds need 10-14 days to sprout, and keeping the soil evenly damp helps them break through.
☀️ Step 2: Select a Sunny Spot and Prepare the Soil
Dill thrives in full sun—at least 6-8 hours daily. A south-facing bed gets the most flowers, but even partial sun works if you're in a hot climate. The soil should drain well because soggy roots lead to rot. Amend heavy clay with compost or sand until it feels loose and crumbly.
I like to work in a 2-inch layer of compost before planting. This feeds the roots and encourages strong stems that support those heavy flower clusters. Avoid fresh manure—it burns tender dill seedlings. A pH between 6.0-7.0 is ideal, but dill is forgiving if your soil leans slightly alkaline.
💧 Step 3: Sow Seeds and Thin for Strong Plants
Plant seeds ¼ inch deep in rows 12-18 inches apart—dill gets bushy and needs space. I use a seed starter kit to space them evenly, but you can also scatter seeds and thin later. Water gently after planting to settle the soil, but don’t drown them. Dill seeds need moisture to germinate, but once up, they’re drought-tolerant.
When seedlings reach 2 inches tall, thin them to 8-10 inches apart. This prevents overcrowding, which spreads disease. The strongest seedlings have deep green leaves and thick stems—keep these and snip the rest at soil level. You’ll have 4-6 mature plants per 4-foot row, perfect for both flowers and foliage.
✂️ Step 4: Encourage Blooms and Harvest Strategically
To get the most flowers, pinch back the tips of young plants when they reach 12 inches tall. This forces the plant to branch out, creating more flower stems. Stop pinching once buds form—you want those energy reserves going to blooms, not leaves. Water deeply once a week during dry spells to keep stems sturdy.
Harvest flowers when fully open but still fresh—usually in late summer to early fall, depending on your zone. Cut stems with 4-6 inches of foliage left to encourage regrowth. The flowers last 3-5 days in water and taste mildly anise-like, perfect for garnishes or dried potpourri. Leave some stems for pollinators—they’ll visit all day long!
🌿 Step 5: Maintain and Extend the Season
After the first flush of blooms, deadhead spent flowers to encourage a second round. Snip off yellowing umbels at the base—this redirects energy to new growth. In cooler climates, mulch plants with straw to protect roots in fall, then harvest again in spring before new growth starts.
If you love dill flowers, try succession planting every 2 weeks for continuous blooms. I’ve had dill flowering from June through October this way. Just watch for aphids—they love dill too. Spray off infestations with soapy water or introduce ladybugs for natural control. With a little care, your dill will reward you with edible blooms, fragrant foliage, and happy pollinators all season long.
Tips & tricks for growing abundant dill flowers
Here's what I've learned after years of growing dill—these tricks will help you get the most fragrant, bee-friendly blooms possible.
Sunlight Secret: While dill tolerates partial sun, the 6-8 hours of full sun really makes a difference in flower production. I've noticed that plants in south-facing beds produce 30-40% more blooms than those in partial shade. If you're in a hot climate, afternoon shade can prevent bolting, but morning sun is essential for strong stems that support those heavy flower clusters.
Germination Hack: The 10-14 days dill seeds need to sprout can feel like forever, but keeping the soil consistently damp (not soggy) during this time is key. I like to use a spray bottle to mist the soil daily—this prevents crusting that can block seedlings. Once they're up, you can reduce watering to once a week during dry spells, as mature dill is surprisingly drought-tolerant.
Pinching Technique: When your plants reach 12 inches tall in Step 4, pinch back the tips to encourage branching. I always use clean scissors to make a clean cut just above a set of leaves. This might seem counterintuitive, but it actually creates more flower stems later. The trick is to stop pinching once buds form—you want all that energy going to flowers, not new leaves.
Harvesting Wisdom: For the best flavor and longest vase life, harvest flowers when they're fully open but still fresh. I like to cut stems with 4-6 inches of foliage left—this encourages regrowth and gives you more harvests. The flowers will last 3-5 days in water if you change the water daily and keep them in a cool spot. For drying, bundle stems and hang upside down in a dark, dry place for 1-2 weeks.
Pro Tips for Fresh Dill Flowers
- Here's what I've learned after years of growing dill—these tricks will help you get the most fragrant, bee-friendly blooms possible.
- Sunlight Secret: While dill tolerates partial sun, the 6-8 hours of full sun really makes a difference in flower production.
- Germination Hack: The 10-14 days dill seeds need to sprout can feel like forever, but keeping the soil consistently damp (not soggy) during this time is key.
Frequently asked questions
Got questions about growing and using fresh dill flowers?
Here are some of the most common ones—plus quick, practical answers to help you make the most of your edible blooms!
When are dill flowers ready to harvest?
Dill flowers typically bloom 60–70 days after planting, depending on your climate. Look for bright yellow-green umbels (flower clusters) that are fully open but still firm. Harvest in the morning after dew has dried for the best flavor and texture. Pro tip: Snip stems just above a leaf node to encourage more blooms!
Can I eat dill flowers raw or do I need to cook them?
Dill flowers are 100% edible and delicious raw. Toss them into salads, garnish soups, or blend into dressings for a bright, tangy flavor. For a milder taste, lightly sauté them with butter or honey. Warning: Avoid overcooking—they can turn bitter.
Will dill flowers attract bees and other pollinators?
Yes! Dill flowers are a magnet for bees, butterflies, and beneficial wasps. Planting them near your garden helps boost pollination for other crops. For extra appeal, let some flowers go to seed—they’ll provide food for pollinators and birds later in the season. Bonus: Deadhead spent blooms to encourage more flowers!
What if my dill flowers don’t bloom?
No blooms? Don’t panic—it’s often due to heat, over-fertilizing, or poor light. Try these fixes:
- Move to full sun (6+ hours/day).
- Use low-nitrogen fertilizer (too much promotes leaves, not flowers).
- Check for pests (aphids or spider mites) and treat organically.
- Consider bolting-resistant varieties like ‘Fernleaf’ dill.
What’s a good alternative if I can’t grow dill flowers?
If dill isn’t your thing, try these edible, pollinator-friendly blooms:
- Borage – Cucumber-like flavor, great in salads.
- Nasturtiums – Peppery taste, pest-repellent.
- Calendula – Mild, citrusy, and medicinal.
- Chamomile – Sweet, tea-friendly, and soothing.
Wrapping up and next steps
Growing fresh dill flowers is a rewarding way to add beauty, flavor, and pollinator support to your garden! Whether you’re harvesting blooms for culinary creativity or simply enjoying their delicate charm, these versatile plants deliver so much in such a small package. 🌸
Ready to take the next step? Start by planting a few seeds this season—your taste buds, bees, and garden will thank you! For extra inspiration, try experimenting with dill-infused dishes or arranging the flowers in bouquets. Happy growing! 🌱✨